GRAINWIZARD – Kurzanleitung
Vom abfotografierten Negativ zum fertigen Positiv: so, wie der Hersteller den Film mit seinem Fotopapier gedacht hat.
1. Vorher: Negative abfotografieren
- In RAW fotografieren (Lumix .RW2, DNG, NEF, CR3, ARW …). TIFF und JPEG gehen auch, RAW ist genauer.
- Etwas Filmrand mitfotografieren. Dort misst GrainWizard die Orangemaske des Films.
- Belichten: Die Lichtquelle in den Perforationslöchern darf ausbrennen, der Filmrand selbst nicht.
- Den ganzen Film am Stück: gleiche Lichtquelle, gleicher Abstand. Die Belichtungsautomatik der Kamera darf an bleiben, Unterschiede werden ausgeglichen.
- Jeden Film in einen eigenen Ordner legen – ein Ordner ist ein Film. Steht der Filmname im Ordnernamen (z. B. „Mai 2026 Portra 400“), wird der Film daran erkannt.
2. Der erste Film
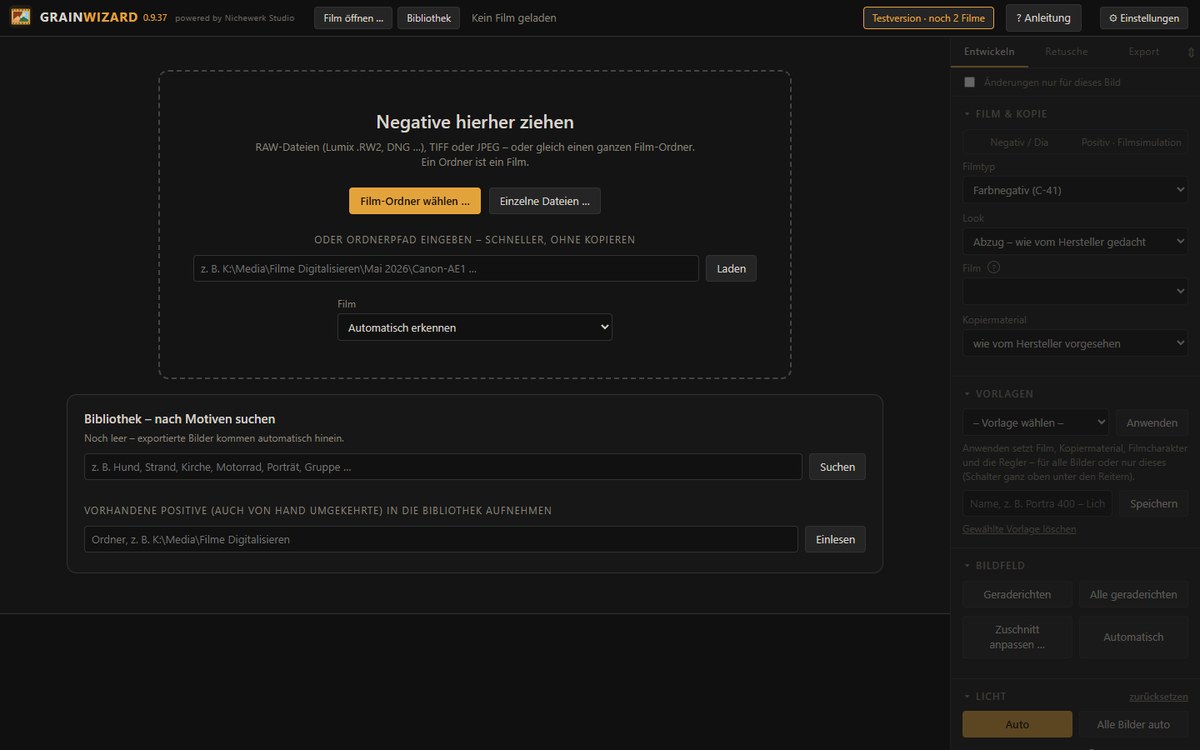
- Den Film-Ordner ins Fenster ziehen, auf „Film-Ordner wählen …“ klicken oder den Ordnerpfad eingeben und Laden – der Pfad ist am schnellsten, weil nichts kopiert wird.
- Unter Film „Automatisch erkennen“ lassen. Nur wenn du es sicher weißt: Farbnegativ (C-41), Kinonegativ (ECN-2) oder Schwarzweiß-Negativ.
- GrainWizard sucht in jedem Bild das Bildfeld, misst die Filmbasis und kehrt alle Bilder um. Danach siehst du unten den Filmstreifen, in der Mitte das gewählte Bild.
Mit den Pfeiltasten wechselst du das Bild, N gedrückt halten zeigt das Negativ. Dein Bearbeitungsstand wird automatisch gespeichert: Öffnest du den Film später wieder, ist alles wie vorher.
3. Film und Kopie wählen
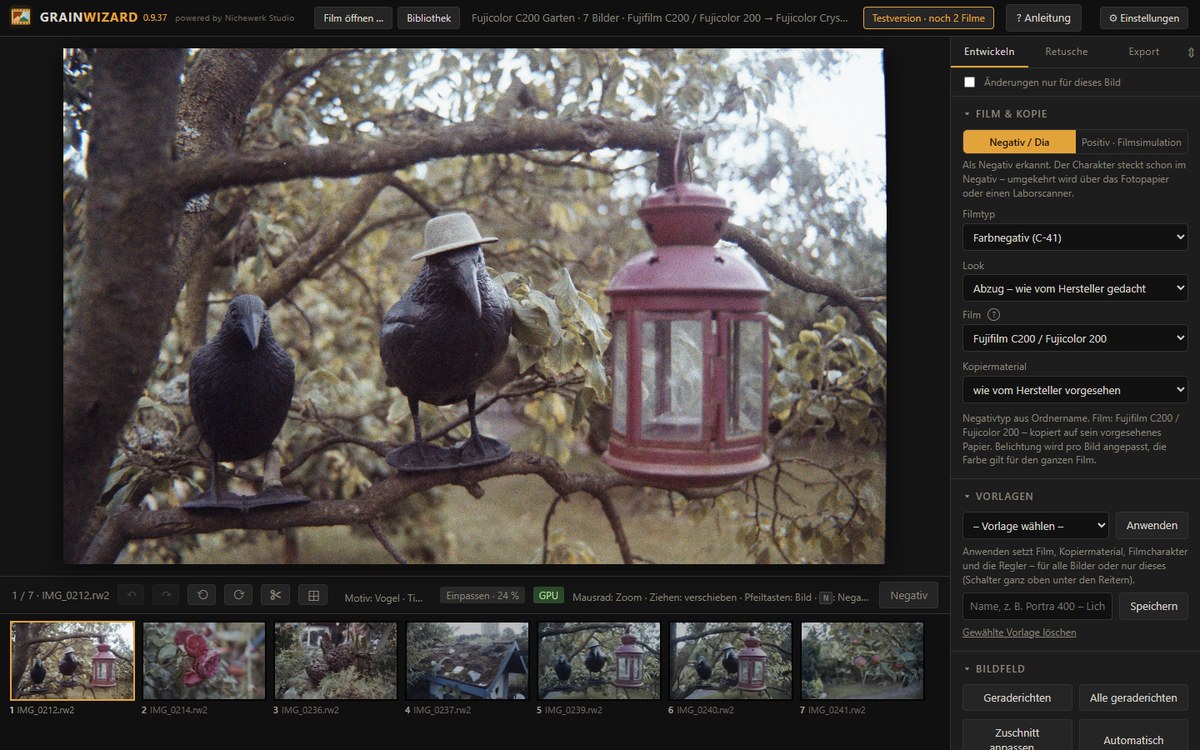
- Negativ: Beim Umkehren wählst du keinen Film – sein Charakter steckt schon im Negativ. GrainWizard erkennt selbst, ob es ein Farbnegativ (C-41) oder ein Schwarzweiß-Negativ ist; liegt die Erkennung daneben, stellst du hier Farbnegativ, Kinonegativ (ECN-2) oder Schwarzweiß-Negativ ein. Steht der Film im Ordnernamen (z. B. „Portra 400“), kopiert GrainWizard auf sein vorgesehenes Papier. Sonst kannst du ihn bei „Abzug – wie vom Hersteller gedacht“ darunter unter Film auswählen (das ? erklärt es kurz).
- Negativ / Dia oder Positiv · Filmsimulation (ganz oben): GrainWizard erkennt selbst, ob du Negative oder fertige Fotos geladen hast; mit den beiden Knöpfen schaltest du um. Beim Negativ kommt kein Stil dazu – der Charakter des Films steckt schon im Negativ.
- Dias: Unter Filmtyp wählst du Farbdia (E-6) oder Schwarzweiß-Dia. Ein Dia ist schon ein Positiv: Es wird nicht umgekehrt und bekommt keinen Filmstil und kein Korn dazu – du stellst nur Bildfeld, Licht und Farbe ein. Exportiert wird als
Original_dia. - Kopiermaterial: Standard ist das Papier bzw. der Kopierfilm, auf den der Film abgestimmt ist (Kodak Endura, Fujicolor Crystal Archive, Vision 2383). Farbfilme kannst du auch auf Schwarzweiß-Papier kopieren.
- Schwarzweiß: Statt Kopiermaterial wählst du die Papiergradation von 0 (sehr weich) bis 5 (extrahart).
Film und Kopie gelten immer für den ganzen Film – wie im Labor.
Fotos wie auf Film: die Filmsimulation
Lädst du fertige Fotos (z. B. JPEG oder RAW einer Digitalkamera), schaltet GrainWizard auf Positiv · Filmsimulation. Dann wählst du unter Filmsimulation einen Film, und das Foto bekommt seinen Charakter: Farbstimmung, Kontrast, Farben in Schatten und Lichtern, beim CineStill den roten Lichthof um Lampen. Gerechnet wird wie beim echten Film – über ein Negativ und das Fotopapier des Films. Stärke regelt, wie viel davon: 0 % lässt das Foto unverändert, 100 % ist der volle Charakter.
Filmkorn
Im Reiter Entwickeln gibt es den Bereich Filmkorn (nur bei Fotos; ein echtes Negativ bringt sein Korn mit). Du wählst zwischen:
- Wie der Film (Standard): Art, Größe und Stärke des gewählten Films.
- Eigene Einstellung: Du stellst das Korn selbst ein.
- Kein Korn.
Bei Wie der Film kannst du das Korn mit dem Regler Stärke (0–300 %) verstärken oder abschwächen; bei Eigene Einstellung geht die Intensität bis 200. Am ganzen Bild wirkt Korn dezent – zum Beurteilen hineinzoomen.
Bei Eigene Einstellung gibt es diese Regler:
- Art und Größe.
- Intensität: wie stark das Korn ist.
- Weichheit: Körner scharf oder verwaschen.
- Rauigkeit: Klumpen, wolkigeres Korn.
- Farbanteil: 0 = reines Helligkeitskorn, hoch = bunt.
- Tonwertlage: Korn mehr in die Lichter oder in die Schatten.
- Symmetrie: helle oder dunkle Körner stechen heraus.
Doppelklick auf einen Regler setzt den Wert des Films. Hinweis: Die Vorschau zeigt das Korn so, wie es bei dieser Bildgröße wirkt; in voller Auflösung siehst du es im Export.
RAW-Fotos: Grundentwicklung
Ein RAW ist dunkler, flacher und blasser als das JPEG aus der Kamera. Damit die Filmstile auf RAW und JPEG gleich wirken, bringt GrainWizard RAW-Fotos beim Laden automatisch auf das Niveau eines normalen Fotos (Helligkeit, Tonkurve, Sättigung), passend zur Kamera. Unter dem Film steht, wie genau die Werte für deine Kamera sind: „für diese Kamera gemessen“, „aus einer Beispieldatei gemessen“, „Mittel des Herstellers“ oder „Standardkurve“ – bei den letzten drei folgen genauere Werte mit späteren Updates. JPEG, TIFF, Negative und Dias bleiben unverändert.
Abschalten: Einstellungen › RAW-Fotos grundentwickeln (gilt ab dem nächsten Laden eines Films).
Meine Kamera messen: Der Knopf unter dieser Zeile bestimmt die Werte für genau deine Kamera aus den geladenen RAW-Fotos. Dafür vergleicht er jedes RAW mit dem Vorschaubild, das die Kamera in die Datei eingebettet hat; es braucht mindestens drei RAW-Fotos derselben Kamera, am besten 6 bis 12 verschiedene Motive. Gespeichert werden nur Messzahlen, keine Bilder. Ab dem nächsten Laden eines Films steht dort „an deinen eigenen Fotos gemessen“, und diese Werte haben Vorrang.
4. Looks: Abzug oder Laborscanner
- Abzug – wie vom Hersteller gedacht: der Film auf seinem vorgesehenen Fotopapier. Bei Farbe wird ein graues Schwarz (dünnes oder flaues Negativ) sanft vertieft, das Weiß bleibt Papierweiß.
- Laborscanner (Fuji Frontier, Noritsu, Kodak Pakon): so, wie ein Minilab den Film ohne Papier umkehrt – z. B. Frontier mit knackigem Kontrast und kühlen Schatten, Noritsu weicher und wärmer. Wie im Labor wird jedes Bild automatisch auf sattes Schwarz und klares Weiß gezogen; Belichtung, Scanner-Tasten und Regler wirken danach wie gewohnt.
- Filmscanner (Nikon Coolscan, Hasselblad Flextight): neutral und klar. Der Coolscan zieht jedes Bild wie in der Scan-Software auf Schwarz und Weiß, ohne Farbstich; der Flextight bleibt weich.
- Log – zum Weiterbearbeiten: sehr flau und grau, wie bei einem Kino-Filmscanner (Cineon): Die Dichte des Negativs wird gerade ausgegeben, jede Blende bekommt gleich viel Platz, nichts wird abgeschnitten. Beim Export legt GrainWizard eine LUT-Datei „GrainWizard Log zu … .cube“ neben die Bilder; sie macht aus dem Log-Bild wieder einen Abzug, z. B. in Affinity (Anpassung „LUT“) oder DaVinci Resolve. Gespeichert wird immer in sRGB, am besten als TIFF 16 Bit. „Auto“ verstellt hier nichts. Lightroom Classic kann .cube-Dateien nicht direkt verwenden.
Unter der Auswahl steht, was den Look und den Film ausmacht.
5. Licht, Farbe, Bildfeld
- Auto optimiert Belichtung und Tonwerte des aktuellen Bildes (mit Menschen im Bild auf die Gesichter), Alle Bilder auto jedes Bild einzeln.
- Auto-Weißabgleich sucht neutrale Flächen und filtert so, wie das Labor kopiert hätte – der Filmcharakter bleibt. Mit der ◉ Pipette (W) klickst du eine Stelle an, die grau sein soll.
- Regler: Belichtung, Kontrast, Lichter, Tiefen, Weiß, Schwarz, Helligkeit, Temperatur, Tönung, Dynamik, Sättigung. Doppelklick setzt einen Regler zurück.
- Farbe auf drei Arten: Unter „Farbe“ wählst du Regler, Farbräder oder Scanner-Tastatur, das Programm merkt sich deine Wahl. Die Farbräder arbeiten wie Color Grading in DaVinci: Tiefen (Lift), Mitten (Gamma), Lichter (Gain) und Offset. Den Punkt ziehst du in die Farbrichtung, mit Umschalt fein; der Regler darunter macht den Bereich heller oder dunkler, Doppelklick setzt zurück. Die Scanner-Tastatur arbeitet wie am Laborscanner: +C, +M, +Y geben mehr Cyan, Magenta oder Gelb, −C, −M, −Y weniger, +D macht dunkler, −D heller, N setzt auf null. Am schnellsten mit dem Ziffernblock: 7 8 9 / 4 5 6 / 1 2 3, Enter auf dem Ziffernblock springt zum nächsten Bild. Die Klicks stehen links oben am Bild. Wie groß ein Klick ist, stellst du unter Einstellungen ein.
- Hintergrund der Arbeitsfläche: Rechtsklick neben das Bild (oder ⚙ Einstellungen) wechselt die Fläche um das Bild zwischen Schwarz, Dunkelgrau, Mittelgrau und Weiß; dort schaltest du auch den Schatten um das Bild ab. Auf Mittelgrau beurteilst du Farben am sichersten, auf Weiß siehst du, wie das Bild als Abzug mit weißem Rand wirkt.
- Oben unter den Reitern: „Änderungen nur für dieses Bild“. Hakst du es an, gilt jede Änderung für alle Bilder des Films.
- Werte übertragen: Rechtsklick auf ein Bild im Filmstreifen › „Werte kopieren“, dann bei anderen Bildern „Werte einsetzen“ oder „Werte in alle Bilder einsetzen“.
- Vorlagen: Film, Kopiermaterial und Regler (bei Fotos auch die Stärke) unter einem Namen speichern und auf andere Filme anwenden.
- Bildfeld: Geraderichten (G) korrigiert Schiefe, Trapez und Wölbung anhand der Perforation oder des Filmrands. Zuschnitt anpassen (C) mit Seitenverhältnissen von Kleinbild bis 4×5. Liegt der Scan schief und die Automatik passt nicht, drehst du im Zuschnitt das Bild unter dem Rahmen: Maus knapp außerhalb einer Ecke halten, bis der gebogene Doppelpfeil erscheint, und ziehen (mit ⇧ in halben Grad) – oder mit dem Regler Drehen (±10°, Tasten , und . in 0,1°-Schritten, mit ⇧ 1°; Doppelklick auf den Regler: 0°). Der Rahmen wird dabei automatisch so weit verkleinert (Format bleibt), dass keine schwarzen Ecken hineinragen; zurück auf 0° bekommt er wieder seine Größe. R dreht das Bild.
6. Staub und Kratzer retuschieren
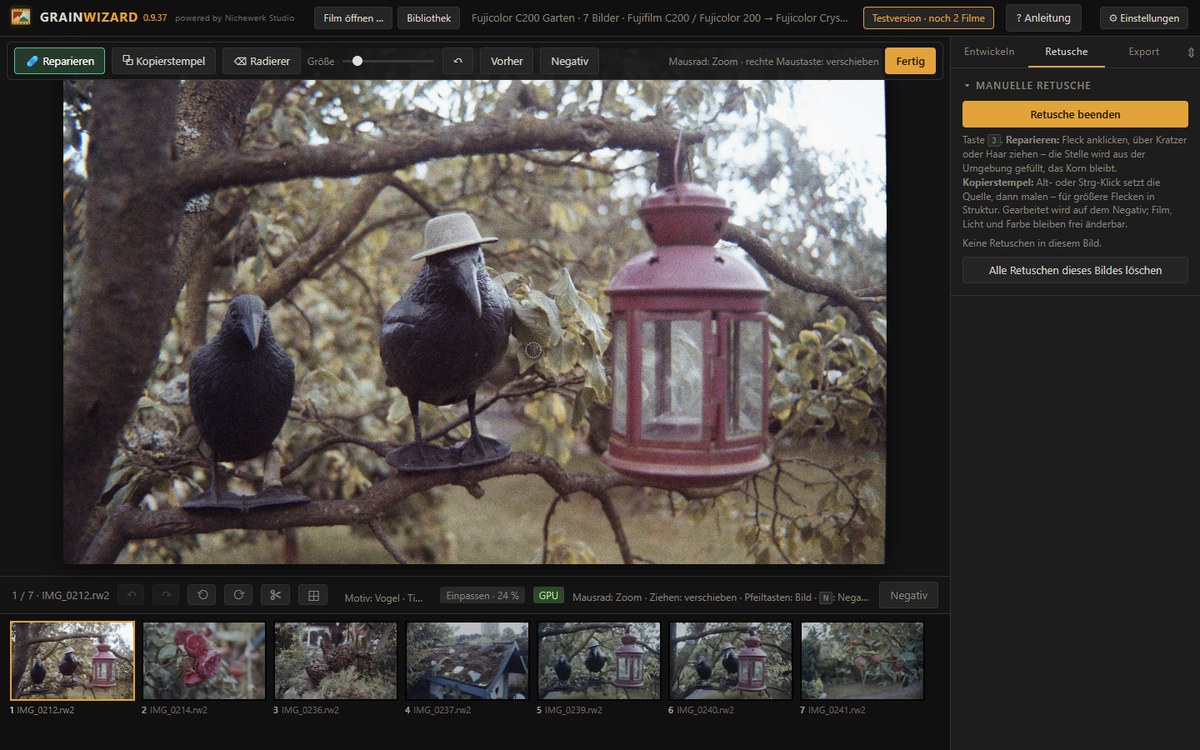
- Reiter Retusche › „Staub und Kratzer von Hand retuschieren“ (oder J). Über dem Bild erscheint die Werkzeugleiste.
- Reparieren (H): einen Fleck anklicken oder über einen Kratzer bzw. ein Haar ziehen. Die Stelle wird aus der Umgebung gefüllt, das Filmkorn bleibt erhalten.
- Kopierstempel (T): Alt- oder Strg-Klick setzt die Quelle, dann über die Stelle malen – für größere Flecken in Struktur.
- Radierer (E): eine Retusche anklicken, um sie zu entfernen. Strg+Z nimmt die letzte zurück.
- Größe mit dem Regler oder [ ]. Vorher (V gedrückt halten) zeigt das Bild ohne Retusche.
Mit dem Mausrad zoomst du, mit der rechten Maustaste verschiebst du das Bild. Fertig beendet die Retusche.
7. Export, Lightroom und Affinity
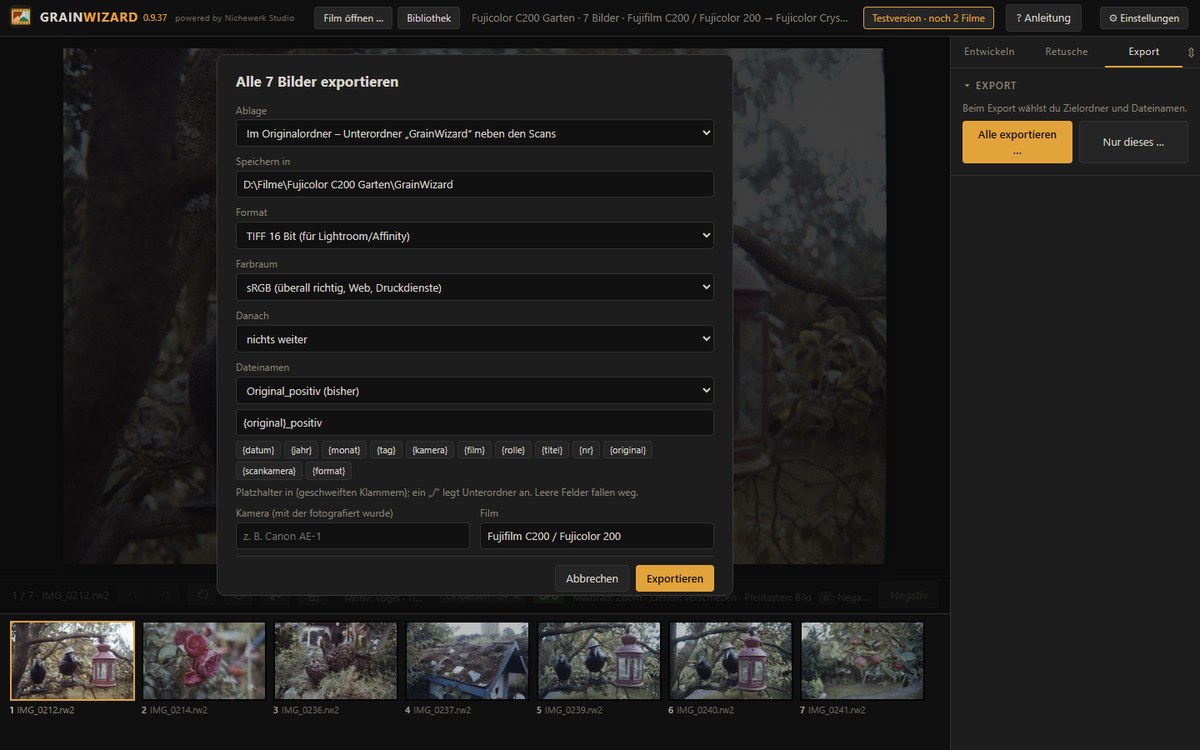
- Reiter Export › „Alle exportieren …“ oder „Nur dieses …“.
- Ablage: im Originalordner (Unterordner „GrainWizard“ neben den Scans), in der GrainWizard-Bibliothek oder in einem eigenen Ordner.
- Format: TIFF 16 Bit zum Weiterbearbeiten, JPEG oder PNG zum Zeigen. Farbraum: sRGB passt überall; Adobe RGB, Display P3 oder ProPhoto (nur mit TIFF 16 Bit) lassen mehr Spielraum.
- Danach: Zielordner öffnen, mit dem Standardprogramm öffnen, in Affinity Photo öffnen – auch als ein Dokument mit einer Seite je Bild oder als Ebenen in einer Datei.
- Dateinamen: Muster mit Platzhaltern wie
{datum}_{kamera}_{film}_{nr}; ein „/“ legt Unterordner an. Die Vorschau zeigt die Namen vorab. - Beim Export des ganzen Films entsteht zusätzlich ein Kontaktabzug.
Aus Lightroom Classic
Negative in der Bibliothek markieren › Bibliothek › Zusatzmoduloptionen › „Negative mit GrainWizard umkehren …“. GrainWizard öffnet genau diese Bilder („Lightroom-Modus“). Umkehren, exportieren, dann „Fertig – zurück zu Lightroom“: Die Positive landen im Katalog, über dem jeweiligen Negativ gestapelt.
8. Tastenkürzel
| ← → | vorheriges / nächstes Bild |
| N | Negativ zeigen (gedrückt halten) |
| W | Pipette für den Weißabgleich |
| R / ⇧+R | rechts / links drehen |
| M / ⇧+M | Bild / ganzen Film spiegeln (Negativ falsch herum gescannt) |
| B | Vorher/Nachher-Schieberegler ein/aus (oben links: Vorher = Negativ oder ohne Regler) |
| G | Geraderichten |
| C, X | Zuschnitt anpassen, Hoch-/Querformat tauschen |
| J | Retusche an/aus |
| H T E | Reparieren, Kopierstempel, Radierer |
| [ ] | Pinsel kleiner / größer |
| V | Vorher (ohne Retusche, gedrückt halten) |
| Strg+Z / Strg+Y | Rückgängig / Wiederholen (Mac: ⌘) |
| Strg+⇧+C / V | Werte kopieren / einsetzen |
| Mausrad, Doppelklick | zoomen, 1:1 bzw. einpassen |
Lizenz und Hilfe
Die Testversion hat alle Funktionen und exportiert 2 Filme. Den Lizenzschlüssel aus der Kaufbestätigung trägst du unter ⚙ Einstellungen › Lizenz ein. Ein Schlüssel gilt für 3 Rechner und wird auf jedem einzeln aktiviert; spätestens alle 30 Tage braucht GrainWizard kurz Internet, um die Lizenz zu prüfen. Bei Problemen: ⚙ Einstellungen › Diagnose-Paket erstellen (Protokolle, keine Bilder) und an support@nichewerk.com schicken.
Updates: Neue Versionen lädst du von nichewerk.com herunter. Liegt die Datei im Download-Ordner oder auf dem Schreibtisch, bietet GrainWizard sie beim Start zur Installation an. ⚙ Einstellungen › Nach Updates suchen öffnet die GrainWizard-Seite im Browser, dort siehst du die neueste Version.
GRAINWIZARD – Quick guide
From a camera-scanned negative to a finished positive – the way the manufacturer intended the film on its photo paper.
1. Before: photographing negatives
- Shoot RAW (Lumix .RW2, DNG, NEF, CR3, ARW …). TIFF and JPEG work too, RAW is more accurate.
- Include some film border. That is where GrainWizard measures the film's orange mask.
- Exposure: the light in the perforation holes may blow out, the film border itself must not.
- Shoot the whole roll in one go: same light source, same distance. Auto exposure may stay on – differences are evened out.
- Put each roll in its own folder – one folder is one roll. If the film name is in the folder name (e.g. “May 2026 Portra 400”), the film is recognized from it.
2. Your first roll
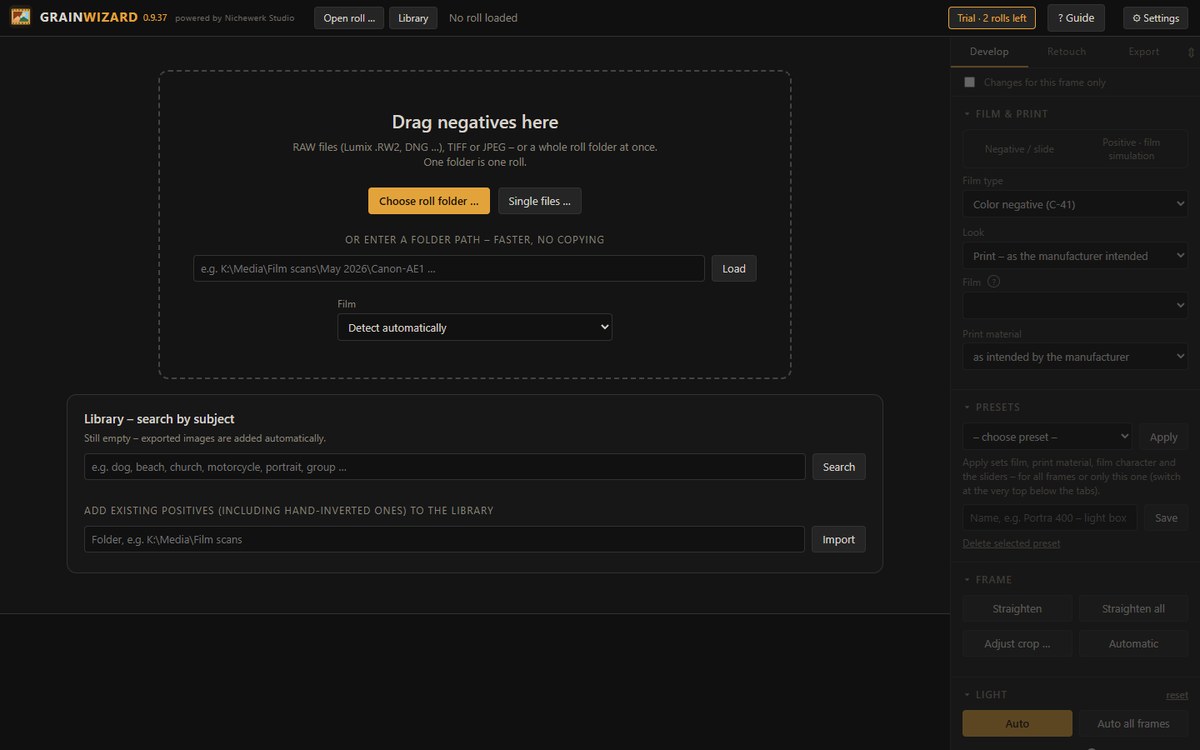
- Drag the roll folder into the window, click “Choose roll folder …”, or enter the folder path and click Load – the path is fastest because nothing is copied.
- Under Film, leave “Detect automatically”. Only if you're sure: color negative (C-41), motion picture negative (ECN-2) or black-and-white negative.
- GrainWizard finds the frame in every image, measures the film base and inverts all frames. Then you see the filmstrip at the bottom and the selected frame in the middle.
The arrow keys switch frames, holding N shows the negative. Your edits are saved automatically: when you open the roll again, everything is as you left it.
3. Choosing film and print
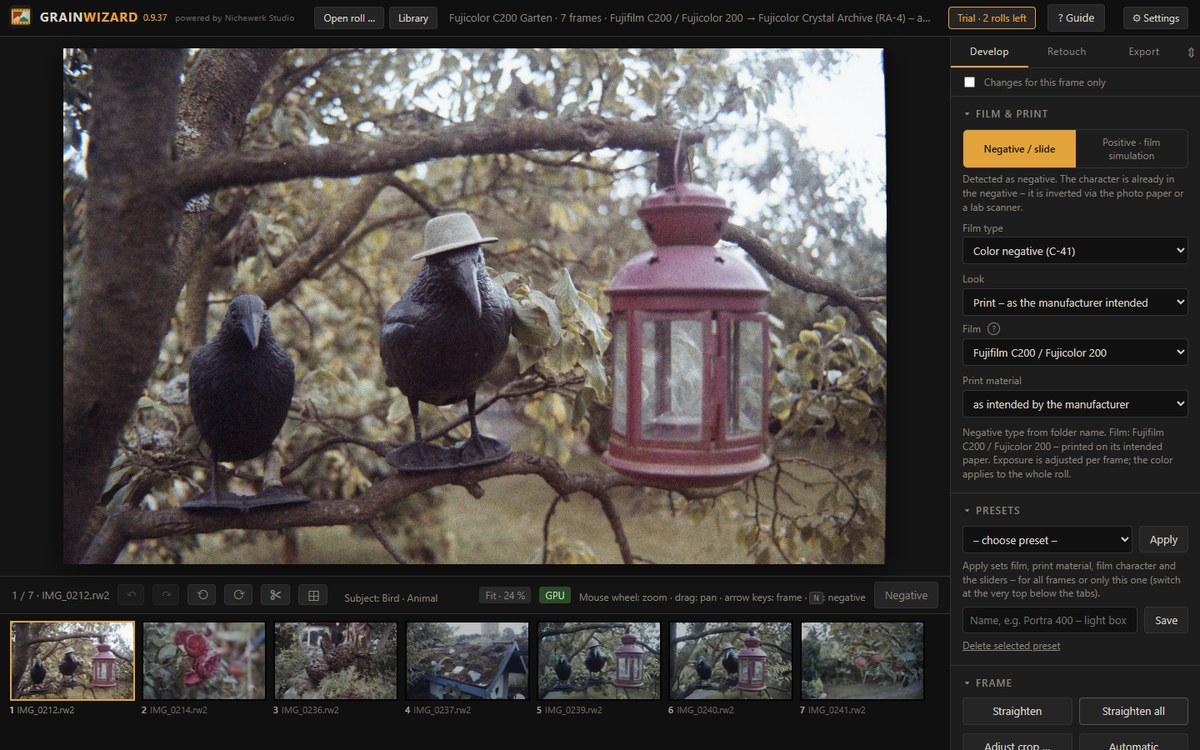
- Negative: when inverting you don't pick a film – its character is already in the negative. GrainWizard detects whether it's a color (C-41) or black-and-white negative; if detection is wrong, set color negative, motion picture negative (ECN-2) or black-and-white negative here. If the film is in the folder name (e.g. “Portra 400”), GrainWizard prints on its intended paper. Otherwise, with “Print – as the manufacturer intended” you can pick it below under Film (the ? explains it briefly).
- Negative / slide or Positive · film simulation (at the very top): GrainWizard detects whether you loaded negatives or finished photos; the two buttons switch between them. With negatives no style is added – the film's character is already in the negative.
- Slides: under Film type choose Color slide (E-6) or Black-and-white slide. A slide is already a positive: it isn't inverted and gets no film style or grain – you only set frame, light and color. It's exported as
original_dia. - Print material: by default the paper or print film the film was designed for (Kodak Endura, Fujicolor Crystal Archive, Vision 2383). Color films can also be printed on black & white paper.
- Black & white: instead of print material you choose the paper grade from 0 (very soft) to 5 (extra hard).
Film and print always apply to the whole roll – just like in the lab.
Photos like film: the film simulation
If you load finished photos (e.g. JPEG or RAW from a digital camera), GrainWizard switches to Positive · film simulation. Choose a film under Film simulation and the photo takes on its character: color mood, contrast, colors in shadows and highlights, and for CineStill the red halation around lights. It is calculated like real film – through a negative and the film's photo paper. Strength sets how much: 0 % leaves the photo unchanged, 100 % is the full character.
Film grain
On the Develop tab there is an area called Film grain (photos only; a real negative brings its own grain). You choose between:
- Like the film (default): type, size and strength of the chosen film.
- Custom: you set the grain yourself.
- No grain.
With Like the film the Strength slider (0–300 %) strengthens or weakens the grain; with Custom the Intensity goes up to 200. Grain looks subtle on the whole image – zoom in to judge it.
With Custom you get these sliders:
- Type and Size.
- Intensity: how strong the grain is.
- Softness: grains sharp or washed out.
- Roughness: clumps, a cloudier grain.
- Color amount: 0 = pure luminance grain, high = colorful.
- Tonal position: grain more in the highlights or in the shadows.
- Symmetry: bright or dark grains stand out.
Double-click a slider to set the film's own value. Note: the preview shows the grain as it looks at this image size; in full resolution you see it in the export.
RAW photos: base development
A RAW file is darker, flatter and paler than the JPEG from the camera. So that the film styles look the same on RAW and JPEG, GrainWizard automatically brings RAW photos to the level of a normal photo when loading them (brightness, tone curve, saturation), matched to your camera. Below the film it says how accurate the values for your camera are: "measured for this camera", "measured from a sample file", "manufacturer average" or "standard curve" – for the last three, more precise values follow with later updates. JPEG, TIFF, negatives and slides stay unchanged.
To switch it off, go to Settings › Apply base development to RAW photos (takes effect the next time you load a film).
Measure my camera: the button below that line determines the values for exactly your camera from the loaded RAW photos. It compares each RAW with the preview image the camera embedded in the file; it needs at least three RAW photos from the same camera, ideally 6 to 12 different subjects. Only measurements are stored, no images. From the next time you load a film the line reads “measured from your own photos”, and these values take precedence.
4. Looks: print or lab scanner
- Print – as the manufacturer intended: the film on its intended photo paper. In colour, a greyish black (thin or flat negative) is gently deepened; the white stays paper white.
- Lab scanner (Fuji Frontier, Noritsu, Kodak Pakon): the way a minilab inverts the film without paper – e.g. Frontier with crisp contrast and cool shadows, Noritsu softer and warmer. As in the lab, every frame is automatically set to deep black and clean white; exposure, scanner keys and sliders work on top as usual.
- Film scanner (Nikon Coolscan, Hasselblad Flextight): neutral and clear. The Coolscan sets every frame to black and white as in the scan software, without a colour cast; the Flextight stays soft.
- Log – for further editing: very flat and grey, like a motion-picture film scanner (Cineon): the negative's density is output straight, every stop gets the same room, nothing is clipped. On export GrainWizard puts a LUT file “GrainWizard Log zu … .cube” next to the images; it turns the log image back into a print, e.g. in Affinity (“LUT” adjustment) or DaVinci Resolve. It is always saved in sRGB, ideally as TIFF 16-bit. “Auto” changes nothing here. Lightroom Classic cannot use .cube files directly.
Below the selection you can read what characterizes the look and the film.
5. Light, color, frame
- Auto optimizes exposure and tones of the current frame (for faces when people are in it), Auto all frames does every frame individually.
- Auto white balance finds neutral areas and filters the way the lab would have printed – the film character is kept. With the ◉ eyedropper (W) you click a spot that should be gray.
- Sliders: exposure, contrast, highlights, shadows, whites, blacks, brightness, temperature, tint, vibrance, saturation. Double-click resets a slider.
- Color three ways: under “Color” choose Sliders, Color wheels or Scanner keypad; your choice is remembered. The color wheels work like color grading in DaVinci: shadows (lift), midtones (gamma), highlights (gain) and offset. Drag the dot towards a color, hold Shift for fine control; the slider below makes that range lighter or darker, double-click resets. The scanner keypad works like a lab scanner: +C, +M, +Y add cyan, magenta or yellow, −C, −M, −Y remove it, +D darkens, −D lightens, N resets. Fastest with the numpad: 7 8 9 / 4 5 6 / 1 2 3, numpad Enter jumps to the next frame. The clicks are shown at the top left of the image. Set the click size under Settings.
- Workspace background: right-click next to the image (or ⚙ Settings) to switch the area around the image between black, dark grey, mid grey and white; the shadow around the image is switched off there too. Mid grey is the safest surround for judging colour; white shows how the image looks as a print with a white border.
- At the top below the tabs: “Changes for this frame only”. Tick it and every change applies to all frames of the roll.
- Copy settings: right-click a frame in the filmstrip › “Copy settings”, then on other frames “Paste settings” or “Paste settings into all frames”.
- Presets: save film, print material, film character and sliders under a name and apply them to other rolls.
- Frame: Straighten (G) corrects tilt, keystone and curvature using the perforation or the film edge. Adjust crop (C) with aspect ratios from 35 mm to 4×5. If the scan is crooked and the automatic doesn't fit, turn the image under the frame in the crop tool: hold the mouse just outside a corner until the curved double arrow appears and drag (with ⇧ in half degrees) – or use the Rotate slider (±10°, keys , and . in 0.1° steps, with ⇧ 1°; double-click the slider: 0°). The frame shrinks automatically (keeping its aspect ratio) so no black corners show; back at 0° it returns to its size. R rotates the frame.
6. Retouching dust and scratches
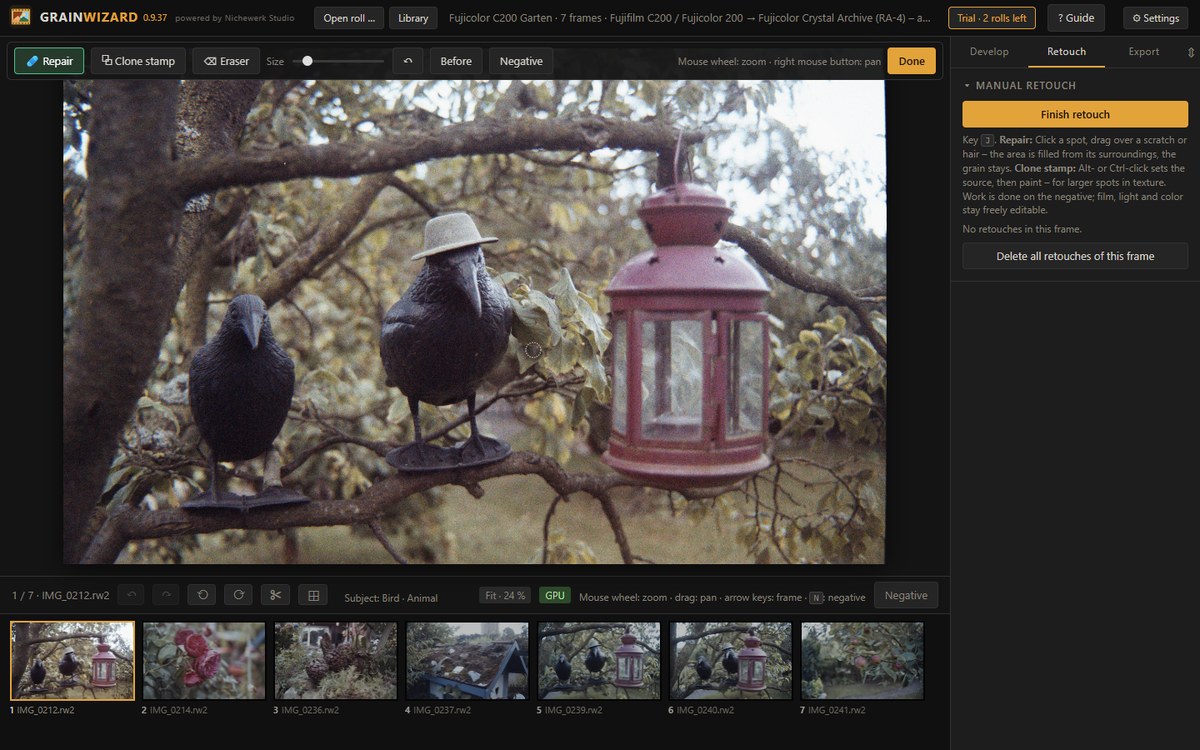
- Retouch tab › “Retouch dust and scratches by hand” (or J). The toolbar appears above the image.
- Repair (H): click a spot or drag over a scratch or hair. The area is filled from its surroundings, the film grain is kept.
- Clone stamp (T): Alt- or Ctrl-click sets the source, then paint over the spot – for larger spots in texture.
- Eraser (E): click a retouch to remove it. Ctrl+Z undoes the last one.
- Size with the slider or [ ]. Before (hold V) shows the frame without retouching.
The mouse wheel zooms, the right mouse button pans. Done ends retouching.
7. Export, Lightroom and Affinity
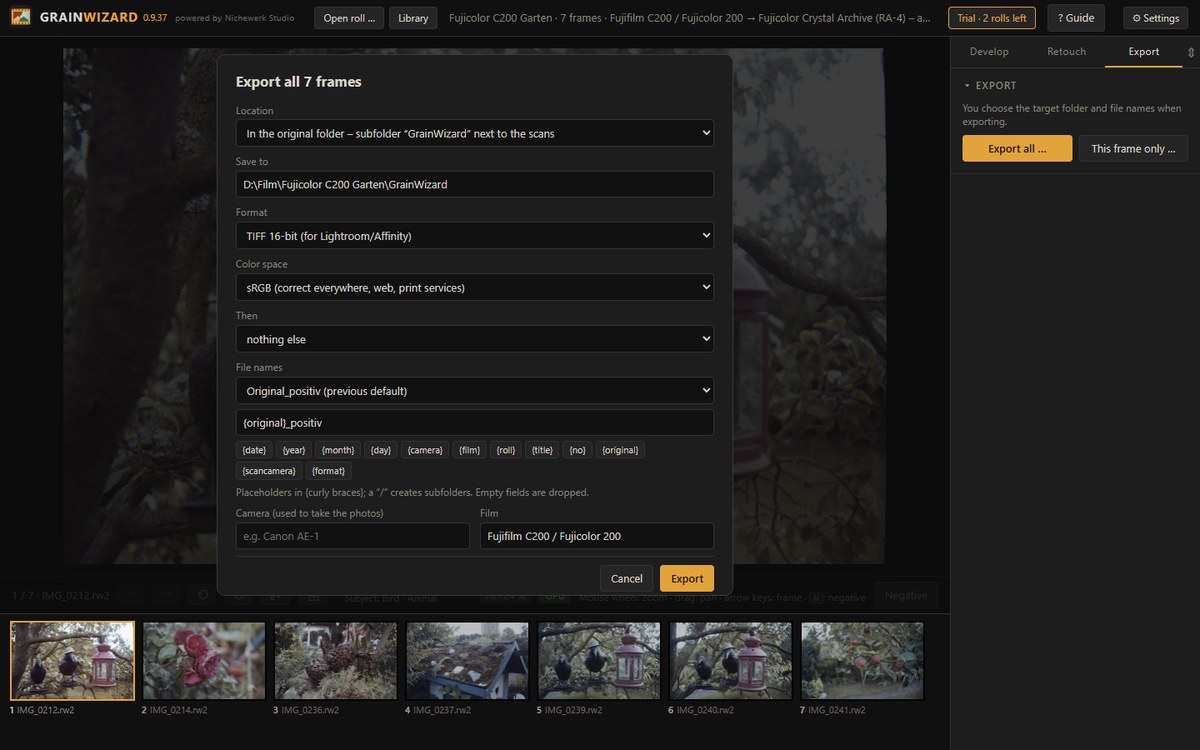
- Export tab › “Export all …” or “This frame only …”.
- Location: in the original folder (subfolder “GrainWizard” next to the scans), in the GrainWizard library, or in a custom folder.
- Format: TIFF 16-bit for further editing, JPEG or PNG for sharing. Color space: sRGB fits everywhere; Adobe RGB, Display P3 or ProPhoto (TIFF 16-bit only) leave more headroom.
- Then: open the target folder, open with the default app, open in Affinity Photo – also as one document with one page per frame or as layers in one file.
- File names: a pattern with placeholders like
{date}_{camera}_{film}_{no}; a “/” creates subfolders. The preview shows the names in advance. - Exporting the whole roll also creates a contact sheet.
From Lightroom Classic
Select negatives in the Library › Library › Plug-in Extras › “Invert negatives with GrainWizard …”. GrainWizard opens exactly these images (“Lightroom mode”). Invert, export, then “Done – back to Lightroom”: the positives are added to the catalog, stacked above their negatives.
8. Keyboard shortcuts
| ← → | previous / next frame |
| N | show negative (hold) |
| W | white balance eyedropper |
| R / ⇧+R | rotate right / left |
| M / ⇧+M | mirror frame / whole roll (negative scanned the wrong way round) |
| B | before/after slider on/off (top left: before = negative or without adjustments) |
| G | straighten |
| C, X | adjust crop, swap portrait/landscape |
| J | retouch on/off |
| H T E | repair, clone stamp, eraser |
| [ ] | brush smaller / larger |
| V | before (without retouch, hold) |
| Ctrl+Z / Ctrl+Y | undo / redo (Mac: ⌘) |
| Ctrl+⇧+C / V | copy / paste settings |
| Mouse wheel, double-click | zoom, 1:1 or fit |
License and help
The trial version has all features and exports 2 rolls. Enter the license key from your purchase confirmation under ⚙ Settings › License. One key covers 3 computers and is activated on each separately; at least every 30 days GrainWizard briefly needs internet to check the license. If something goes wrong: ⚙ Settings › Create diagnostic package (logs, no images) and send it to support@nichewerk.com.
Updates: download new versions from nichewerk.com. If the file is in your Downloads folder or on the desktop, GrainWizard offers to install it at startup. ⚙ Settings › Check for updates opens the GrainWizard page in your browser, where you see the latest version.